How to Buy Travel Medical Insurance
Once you’ve completed the steps on our “What to Do Before You Buy a Policy” checklist, you’ll be just about ready to purchase your travel medical plan. But before you head over to get a quote for your chosen plan, make sure you have the following information on hand:
- Your destination
- The date you want your coverage to start and end
- The maximum coverage you’d like for your plan
- The deductible you’d like for your plan
- Your home country and citizenship
- Your passport number (optional)
- The following information for each traveler on your policy:
- Name
- Date of birth
- Passport number (optional)
- Citizenship
- Your mailing address and postal code
- Your email address
- Your credit or debit card number, card security code, and expiration date
Now we’ll take you on a visual walkthrough of the Atlas Travel insurance quote engine from WorldTrips. This should give you an idea of what the purchasing process looks like, and we’ll (hopefully!) answer any questions you may have along the way.
Find the Atlas Travel Quote Engine
Click here to go straight to the quote engine. You can use this to obtain a free quote or to purchase a policy. If at any point you find yourself unsure what a question is asking, look for the ![]() symbol to provide you with further detail.
symbol to provide you with further detail.
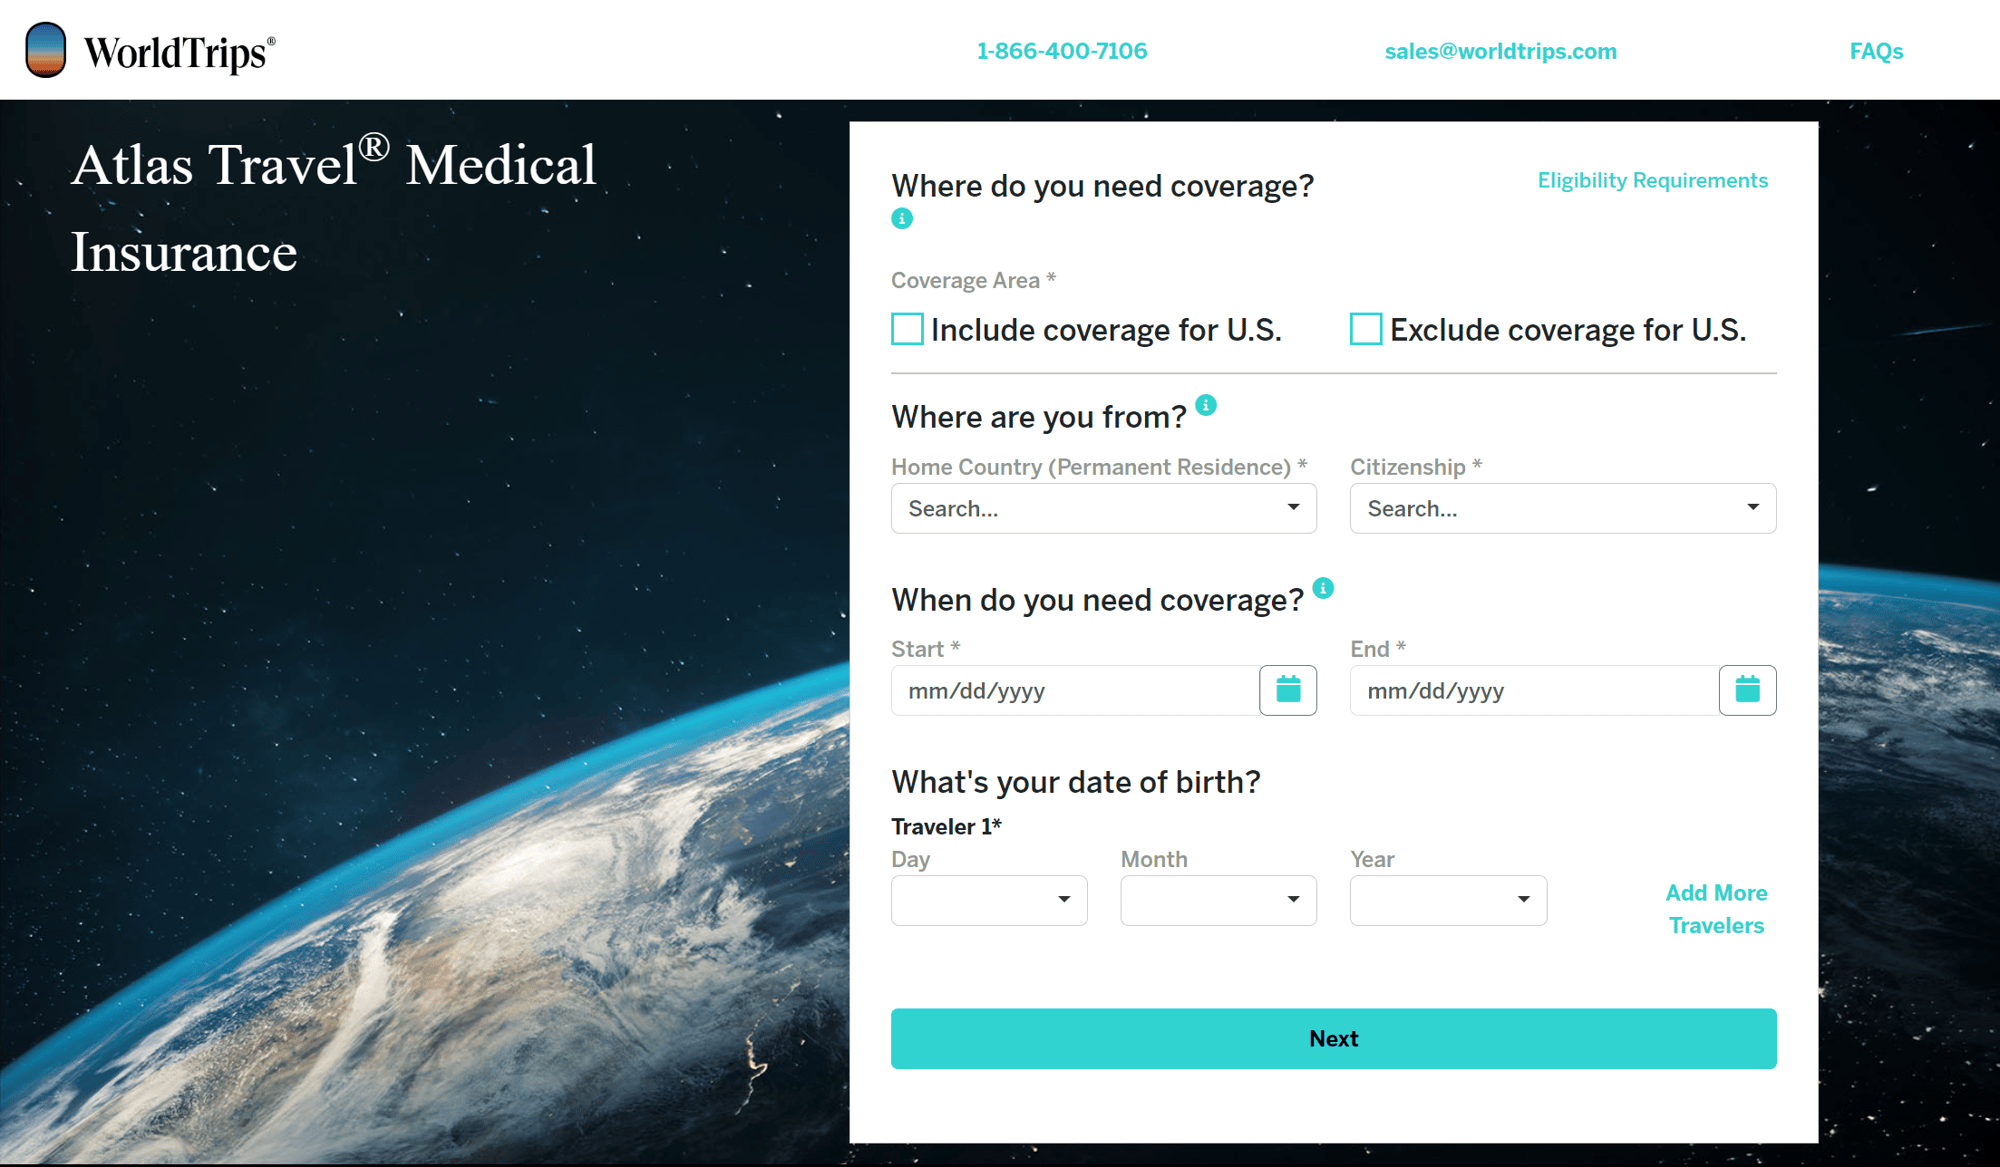
Step One: Select Your Coverage Area, Residency, and Date of Birth
Where Do You Need Coverage?
You’ll need to begin by answering the question of whether your coverage includes the U.S. or excludes the U.S. Select the box that best describes your trip’s coverage area.
- If your destination includes the 50 U.S. states, Puerto Rico, and/or U.S. Virgin Islands -> check “Include coverage for U.S..”
- If your destination includes Guam, American Samoa, Northern Mariana Islands, and/or no other part of the U.S. -> check “Exclude coverage for U.S.”
But, what about layovers within the U.S.?
- If you are a U.S. citizen or resident and your trip includes a layover within the 50 U.S. states, Puerto Rico, and/or U.S. Virgin Islands prior to your departure from the U.S. -> check “Exclude coverage for U.S.”
- If you’re a non-U.S. citizen or non-U.S. resident and your trip includes a layover within the 50 U.S. states, Puerto Rico, and/or U.S. Virgin Islands -> check “Include coverage for U.S.” if you want coverage during your layover
Note: Click the “Eligibility Requirements” link at the top right of the quote engine for details regarding plan eligibility.
If you select “Include coverage for U.S.,” a “Destination(s)” section with appear and the United States will automatically be added. Where it says “Search” type in any additional destinations or click the drop-down arrow and select your trip destination(s). Include ALL destinations for which you would like to be covered. Click the teal “x” to the right of the destination to remove it.
Then, under “Primary U.S. Destination” select the state in which you will spend the most time. If you are spending equal time in multiple U.S. states, choose the state you will visit first.
If you select “Exclude coverage for U.S.,” a “Destination(s)” section will appear. Either type in your destination(s) in the search bar or use the drop-down arrow to add the destination(s) to which you are traveling. Include ALL destinations for which you need coverage. Click the teal “x” to the right of the destination to remove it from the list.
NOTE: Certain countries are currently excluded from coverage due to U.S. government sanctions. If you’re not sure whether your destination is excluded, contact WorldTrips at (877) 690-9859. Additionally, certain benefits, such as the Political Evacuation and Terrorism benefits, are restricted based on U.S. Department of State and the Centers for Disease Control and Prevention (CDC) travel advisories, as indicated in the policy wording. Review the Atlas Travel policy wording and the complete list of travel warnings by the U.S. Department of State.
Where Are You From?
After selecting your coverage area and destinations, select your home country and citizenship.
Note: If you select “United States” as your home country, you will be prompted to select your “Mailing Address State.” You can select this by typing it in or clicking the drop-down arrow and selecting your state.
When Do You Need Coverage?
Next, you’ll need to select your coverage dates. You may type in your coverage start date and coverage end date (using the format MM/DD/YYYY) or use the interactive calendar to select your dates.
- Coverage Start Date – This is the first day you'll be covered, and it is usually the day you depart your home country. Please note that coverage will not start until the moment you have left your home country. Today's date is the earliest date you can use for your coverage start date, and today’s date plus six months is the latest date you can use for your coverage start date.
- Coverage End Date – This is the last day you'll be covered and is usually the day you return to your home country. Please note that coverage ends the earlier of either the moment you return to your home country (unless you have started a benefit period or are eligible for home country coverage) or 11:59 p.m. Eastern Time on your chosen end date, which is shown on your policy fulfillment documentation.
What’s Your Date of Birth?
Finally, type in the first traveler’s birthdate using the drop-down arrow or typing in the day, month, and year. Click “Add Traveler” to add each additional traveler to the policy, and fill in each traveler’s birthdate. Then hit the teal “Next” button.
If your quote does not process, a message will provide detail as to what information needs to be completed or revised. If you’re still not sure why your quote is unable to process, contact WorldTrips within the U.S. at (800) 605-2282 (toll-free) or outside the U.S. at +1 (317) 262-2132 (collect calls accepted).
Page One: Choose Your Coverage
Plan Recommendation
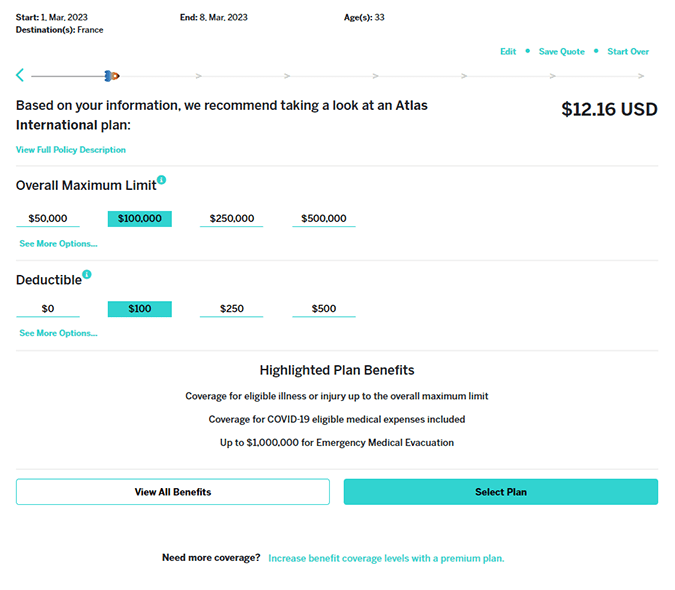
Based on your provided information, we will recommend a plan to you. The name of the plan will be listed at the top of the page in bold, and you can view your plan’s policy documents by clicking “View Fully Policy Description” below your plan name.
To the right of this is your quote. Your quote is the premium you are due for your selected coverage. This will adjust based on your coverage and deductible selections.
Note: At any time, view your plan’s start date, end date, age of traveler(s), and destination(s) at the top of the page.
Click the teal “Edit” at the top right of your screen to edit these details. You can easily save the quote and have it emailed to you by clicking “Save Quote” and typing in your email, or click “Start Over” to take you back to the first screen.
Also note the progress bar at the top of the page that tells you how far along you are in your purchase. The spaceship will move to the right along the bar as you complete each step. Click the teal back arrow at any time to return to a previous page.

Overall Maximum Limit and Deductible
You will first be prompted to select your overall maximum limit and your deductible. The overall maximum limit is the maximum amount that your policy will pay toward eligible expenses incurred per coverage period, except for certain benefits that are not subject to the overall maximum limit as stated in the policy. The deductible is the dollar amount of eligible expenses you must pay before your plan starts to pay its share of eligible expenses.
Note the adjustment in your policy’s premium in the top right corner if you adjust these numbers.
To make things easy, we’ve already selected our most popular overall maximum limit and deductible for your recommended plan. Select from one of the three other options for your maximum limit and deductible or click “See More Options” for even more choices.
Plan Highlights and Viewing All Benefits
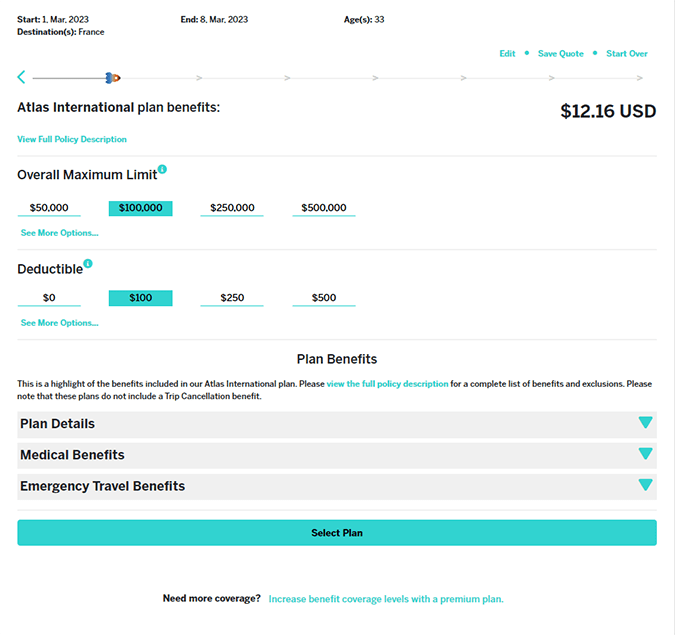
After selecting your overall maximum limit and deductible, you will find a highlight of your plan’s benefits below. If you want more details about your plan, click the “View All Benefits” button. Click each item drop-down arrow for plan details, medical benefits, and emergency travel benefits. You can also view the policy documents by clicking the teal “view the fully policy description” text just below “Plan Benefits.”
Once you are ready to continue, click the teal “Select Plan” button at the bottom of the page.
Note: Would you prefer a plan with more coverage? Scroll to the bottom of the page and click the teal text: “Increase benefit coverage levels with a premium plan.”
Page Two: Upgrades
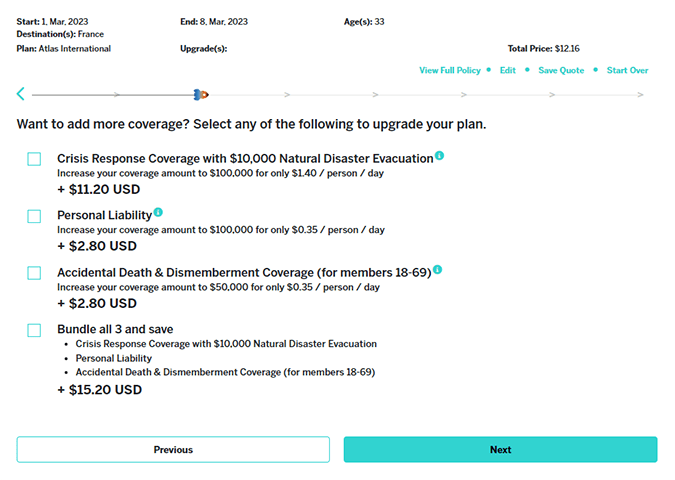
On this page, you will be presented with a variety of coverage upgrades available for your plan. Check the teal box next to each upgrade you would like to add to your policy. Need a benefit refresh? Click the ![]() next to the coverage name for a benefit description.
next to the coverage name for a benefit description.
Note the dollar amount below each coverage upgrade. This reflects the additional premium that will be added to your overall plan premium per person per day. Total premium (including each selected upgrade) will be reflected in the total price in the top right corner of the screen.
Note: Keep in mind, some upgrades may only be available to certain members. These coverage limitations will be noted (if applicable) following the coverage name.
When you’re ready to move on to the next page, hit the teal “Next” button.
Page Three: Traveler Information
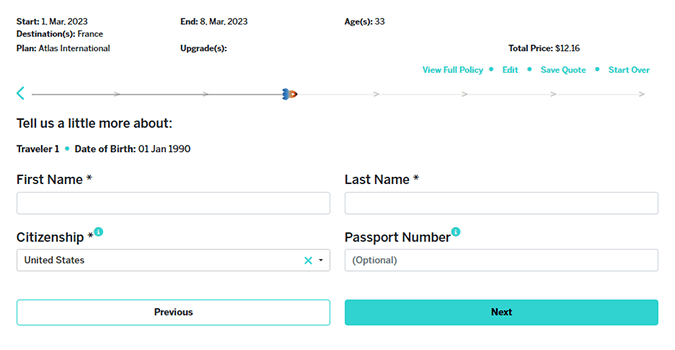
This is where you’ll fill in your personal information (or the information of the traveler(s) on the policy). Enter your first name, last name, citizenship, and passport number (optional).
You may choose to provide your passport number if you require a Visa letter and would like your passport number to be included on it. (Once you’ve purchased your policy, you’ll be able to download this letter in PDF format through the Member Portal.).
Click the teal “Next” button to move on to the next step.
Page Four: Mailing Information
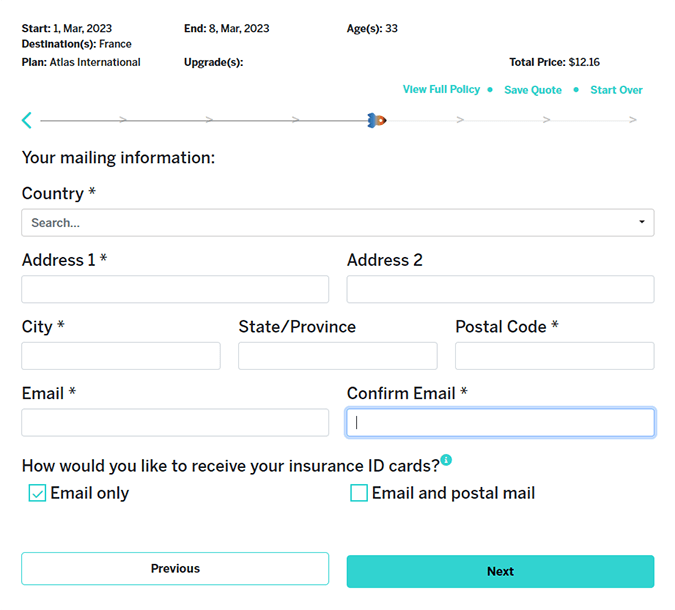
On this page, you’ll enter your mailing address and email. You’ll also be asked how you would like to receive your insurance ID cards.
Where it says “How would you like to receive your insurance ID cards?” select your delivery option: “Email only” or “Email and postal mail.” If you select “Email Only,” then your ID cards* will be sent to the provided email address as soon as your application has been processed and your credit card has been approved.
If you select “Email and postal mail,” you’ll receive your ID cards via email as well as via postal mail to the address entered on your application. You’ll be prompted with two different mailing options if you make this selection: “Regular Mail – No additional charge” and “Express Mail = $20.” Check the box next to your mailing option of choice.
PRO TIP! For trips starting within a week of purchase, we recommend you choose “Email only” here.
Page 5: Payment
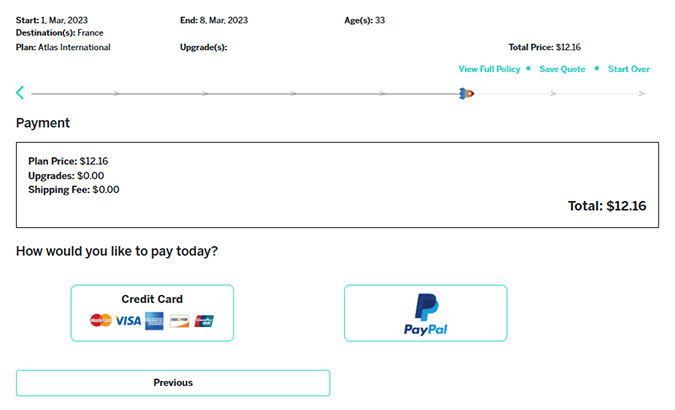
View your final policy total, and select your payment method: “Credit Card” or “PayPal.”
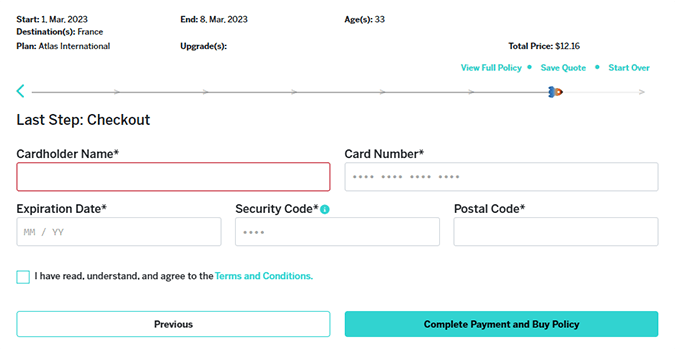
For those who select credit card, you’ll be asked to fill in the cardholder name, card number, expiration date, security code, and postal code.
Your card security code is a 3-digit number on the white strip on the back of your card (or, for American Express, a 4-digit number on the front of the card above the card number). The month and year is your card’s expiration date.
Finally, read through the Terms and Conditions, and check the box if you agree. Click the “Complete Payment and Buy Policy” button to head to the confirmation page!
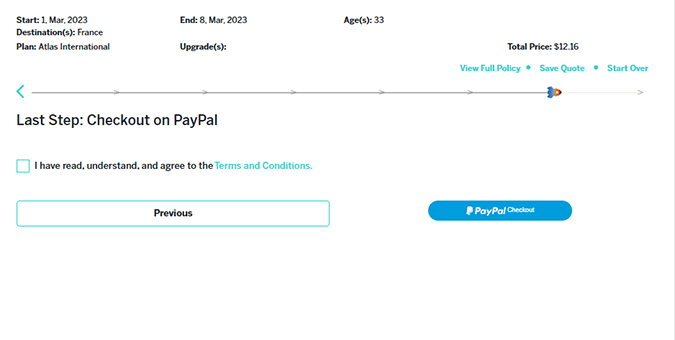
For those who select PayPal, you’ll be automatically moved to the next screen. Read through the Terms and Conditions, and check the box if you agree. Click the blue “PayPal Checkout” button, and you will be redirected to PayPal to authorize your purchase.
*ID Card: Your ID card includes your name, the name of your insurer, your ID number, your effective date of coverage, and your international provider network. Should you need to seek medical treatment, you can present this card to your medical provider as proof of insurance.
Page Five: Confirmation
This final page confirms your policy purchase and allows you to download your fulfillment documents directly. Your documents will also be sent to your email address immediately following your purchase.
Now What?
Now that you’ve officially purchased your international coverage, it’s time to complete steps 1-5 of our “What to Do After You Buy a Policy” checklist.
Need Help?
- With general customer service questions, call within the us (800) 605-2282 (toll-free) or outside the U.S. +1 (317) 262-2132
- Visit our customer service page
- Email sales@worldtrips.com for policy cancellations and credit card updates
Need to Cancel?
If you decide that your Atlas Travel insurance policy does not meet your needs or you wish to cancel for any reason, you can submit a cancellation request to WorldTrips in writing to receive a refund of premium.
To be eligible for a full refund, the cancellation request must be received prior to your policy’s effective date. If WorldTrips receives your cancellation request after the effective date, you will be charged a $25 cancellation fee and only the unused portion of the plan cost will be refunded.
Only members who have no claims are eligible for premium refund.
To cancel your Atlas Travel policy, contact WorldTrips by email at service@worldtrips.com.
Include the following information:
- First name
- Last name
- Date of birth
- Certificate number
- Reason for cancellation
KHE2FFFYH6SP-971744701-735
WorldTrips is a member of the Tokio Marine HCC group of companies. WorldTrips international travel medical insurance products are underwritten through binding authorities with TMHCC (CI) Insurance SPC Ltd and Houston Casualty Company (HC).
